Weather Network meteorologist's astro pic featured by NASA
Meteorologist/Science Writer
Thursday, October 19, 2017, 12:15 PM - Weather Network meteorologist and amateur astrophotographer, Kerry-Ann Lecky Hepburn, captured an amazing picture of the famous Whirlpool Galaxy earlier this year, and now even NASA is taking notice!
Head over to NASA's Astronomy Picture of the Day (APOD) site on any given day, and you're in for a treat. The images featured on the website are likely to be some of the most amazing and fascinating you'll see, and on October 19, 2017, one of the meteorologists here at The Weather Network got a real treat of her own, as NASA featured one of her recent astrophotographs, of Messier 51, aka M51, aka The Whirlpool Galaxy.
Located some 20 to 30 million light years away, M51 was first discovered in 1773, by French astronomer Charles Messier. This small galaxy (roughly a third the size of the Milky Way) is probably one of the most photographed galaxies, as it is relatively easy to find and see.

M51's position in the night sky, in relation to the Big Dipper. Credit: Stellarium/Scott Sutherland
The inset in the image above shows an idealized view of M51, via the free planetarium software, Stellarium. Simply looking at M51 with a telescope, or a good pair of binoculars, though, reveals a faint grey splotch in the eyepiece, even under clear, calm, dark skies.

M51, as seen through a telescope or binoculars. Credit: Kerry-Ann Lecky Hepburn
The reason why this image looks so faint is because of how the human eye works. In order to properly represent our surroundings to us (or at least as closely as possible), our eyes only retain the light they gather for a very short period of time - on the order of 1/16 of a second. After that, it gets cleared away for the next batch of information.
We can take the time to let our eyes adapt to the dark, to engage the rod-shaped photoreceptors that are responsible for low-light vision, and this does help us to see darker, fainter objects better. Due to the shape of these photoreceptors, though, they only deliver information to our brain in greyscale, and we sacrifice a lot of the fine details in the process.
If our eyes retained light for a longer period of time, stacking it up with what it has already gathered, that would help us to see more colour and details from these distant objects, but it would also cause us plenty of problems in our normal daily life. Rather than seeing life in real time (or at least near-real time), it would be like seeing in time lapse. Good luck walking around without banging into other people or moving objects, and you wouldn't want to get behind the wheel of a vehicle!
Good thing we have technology, though, to gather the amount of light we need.
With the right telescope, the right camera focused through that telescope, and the right computer software to make the most out of what the camera captures, that dim, grey splotch becomes a bright, vibrant, detailed masterpiece, like this:
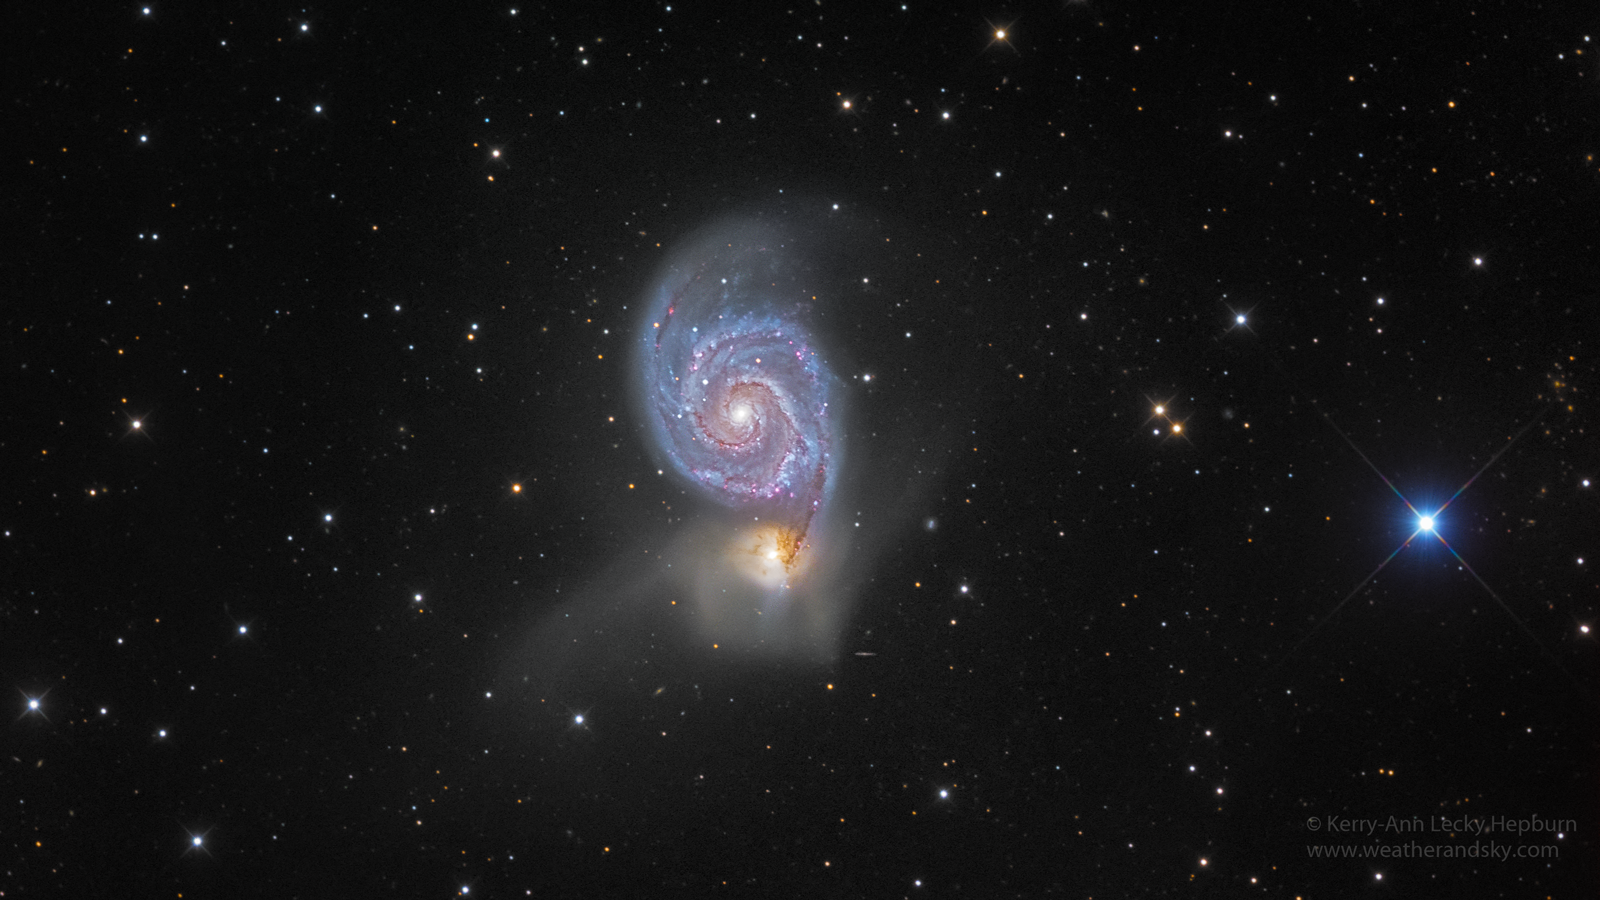
CLICK TO ENLARGE. Credit: Kerry-Ann Lecky Hepburn
I sat down with Kerry-Ann for a little Q&A, to ask how she went about capturing this beautiful image.
Scott Sutherland: From what location did you take this picture?
Kerry-Ann Lecky Hepburn: The Niagara Region, in Ontario, Canada.
SS: How did you deal with light pollution?
KALH: In order to cut through the light pollution it helps to acquire as much integrated exposure time as possible through the camera and lens/telescope. I took close to 50 10-minute exposures, through various filters, and stacked them to give me an image that can be processed in a way that will allow me to extract as much detail and colour as possible.
I also make sure that when I start exposing the frames, I wait for the target to be as high in the sky as possible, away from light pollution domes, which tend to cover lower angles in the sky. Also the higher your target is, the less atmosphere you have to image through. You get better transparency and seeing conditions. Doing this technique sometimes requires you to collect your image frames over several cloud free, moonless nights.
|
|

SS: What equipment did you use to capture this image?
KALH: I use an 8-inch Ritchey Chretien Telescope, which has a similar design to the Hubble Space Telescope, but is much, much smaller, and I took the images with a cooled monochrome CCD camera, with filters for red, green, blue and luminance. (Note: a cooled monochrome charge coupled device camera is a filmless camera that converts light into electrons to capture images. It is cooled to decrease the noise caused by heat buildup during long exposures, and being monochrome, all of the elements in the CCD simply read light or dark, without capturing colour. The red, green and blue filters are added, individually, each to filter for those specific wavelengths of light. When images taken using all three filters are combined, the result approximates true colour.)
SS: How long have you been interested in astrophotography? How did you get into it?
KALH: My interest in astronomy started when I was in elementary school, but it wasn't until I started taking a film photography class in high school that I began to think of the possibility of doing astrophotography. I'd say I have been involved in this hobby for over 25 years now.
SS: What kind of advice would you give to someone who would like to get into astrophotography?
KALH: There is a lot to learn and no better way to start the process than by doing a lot of research online.
Join online beginner astrophotography forums and participate in a local astronomy and/or camera club, where you can meet people that will be able to guide you in the right direction. Most importantly, look up at the night sky and try to take pictures with the camera and lens setup that you already have. Keep it simple at first . For example, try shooting with a DSLR and simple lens, on a tripod, and then gradually over time (as you gain more knowledge and experience) you can start building up your astrophotography setup to something more complex.
Research, determination, patience and practice are the keys to this hobby.
For more of Kerry-Ann Lecky Hepburn's astrophotography and weather photographs, visit www.weatherandsky.com.